SAP SuccessFactors Integration Guide
 Updated
by
Integrations Team
Updated
by
Integrations Team
- Activating the Integration
- Before you Begin
- Setting up your Integration
- Configuring your Packages
- Permissions (Provisioning)
- Add Assessment Vendor (Admin Center)
- Add Assessment Vendor Packages (Provisioning)
- SFAPI Integration User (Admin Center)
- Event Notification Subscription (Admin Center)
- Add Assessment field to Job Requisition (Provisioning)
- Hard Stop Status (Optional)
- Email Template (Optional)
- Screen Layouts

Activating the Integration
Before you Begin
- You must have appropriate SAP SuccessFactors licensing to use the Assessment Integration.
- Ensure that you have Provisioning access from SAP.
Remember: As a customer, you don't have access to Provisioning. To complete tasks in Provisioning, contact your implementation partner or Account Executive. For any non-implementation tasks, contact Product Support. - Ensure that you grant Manage Assessment Vendors permission to recruiting users.
- Advise Criteria if you plan to use a proxy / middleware between SuccessFactors and Criteria.
- The integration will be set up in a non-production environment first and will then be set up in production once testing has been completed. Criteria will provide 1 Criteria Sandbox to use with a non-production SuccessFactors environment. (If you have multiple non-production environments the Criteria Sandbox may be reconfigured to talk to a different environment as testing progresses through these lower environments.)
Setting up your Integration
- Decide if you would like to add Criteria Jobs or Criteria Custom Integration Packages into SuccessFactors
- Criteria will initialize the integration and provide credentials to use in SuccessFactors
Criteria will give you:- List of packages - names and IDs
- Details to use in the event notification subscription - URL, username and password
- You and your SuccessFactors partner will configure SuccessFactors and provide the credentials to Criteria.
You will give Criteria:- SuccessFactors company ID (case-sensitive)
- SuccessFactors API URL E.g., https://api8.successfactors.com/, https://api10preview.sapsf.com/
- SuccessFactors environment name E.g., DC8 Production, DC10 Preview
- API user details (once the user is created)
- Basic Auth - username and password
- OAuth2 - username, OAuth2 Client ID, OAuth2 Private Key
- The integration will be tested
If the initiate setup was initially done for your SuccessFactors non-production environment, the whole process will be repeated for your production account.
Configuring your Packages
Assessment Packages are created in SuccessFactors. These packages are associated with your SuccessFactors requisitions and candidates are invited to these packages when they are moved into the requisite status. The package tells Criteria what testing to invite the candidate to complete. Generally, in a Criteria integration, your Criteria Jobs are added as the packages in your ATS.
SuccessFactors does not allow packages to be deleted once they are added, only the package name may be changed.
If the Criteria Jobs are added as the package in SuccessFactors, and the Criteria Jobs change over time, you may end up with a lot of old packages in SuccessFactors that you cannot remove. Also, you will likely need to engage your SAP SuccessFactors consultants to make the package changes since these are configured in the Provisioning area within SuccessFactors.
An alternative to adding the Criteria Jobs directly into SuccessFactors is to use Custom Integration Packages. This functionality in your Criteria platform allows you to create custom packages and add these as static packages in SuccessFactors. However, you will need to remember to add a new mapping to the Custom Integration Package each time you create a new requisition in SuccessFactors.
Note: You can use a mixture of Standard Packages and Custom Integration Packages in SuccessFactors.
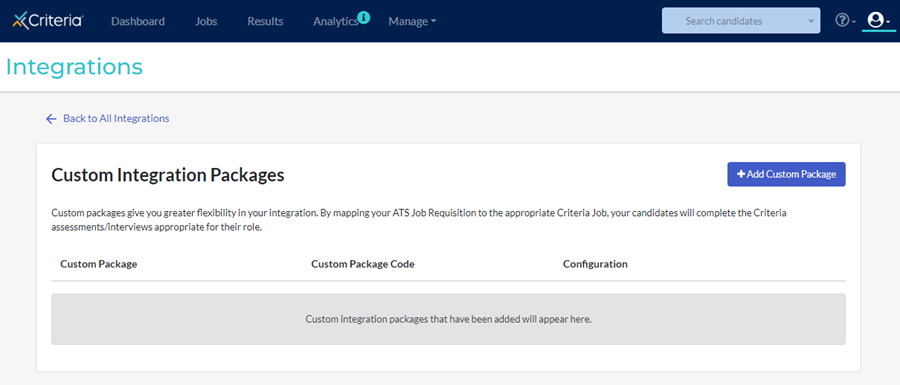
- Custom Integration Packages functionality allows you to map your SuccessFactors Requisitions to specific Criteria Jobs within the Criteria platform.
The Custom Integration Package/s will be added as packages to SuccessFactors for selection on the SuccessFactors Requisition when Criteria testing is to be used.
When a candidate is invited to a Custom Integration Package, the SuccessFactors Requisition ID will be used to determine the correct Criteria Job to use for that candidate.
If you have not set up a mapping for a SuccessFactors Requisition before the candidate is invited, Criteria can invite the candidate to a pre-defined default Criteria Job, or you may choose to have the invitation result in an error (you can make a report in SuccessFactors to show you the be errored invites) and you can trigger the testing again once you have added the mapping into the Criteria Custom Integration Package setup.
- Standard functionality will use the Criteria Jobs as the packages in SuccessFactors and you will choose the specific Criteria Job on the SuccessFactors Requisition.
If you opt to create Custom Integration Packages, you could create 1 package for the whole integration or you could make multiple packages based on different departments (e.g. Finance vs Operations) or types of roles (e.g. Executive vs Non-Executive).
Setting up your Criteria Custom Integration Packages
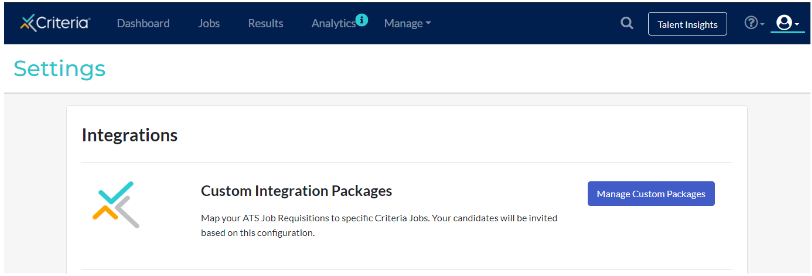
In Criteria, click on your avatar at the top right, and then select the Integrations menu. Click Manage Integration Settings, then click Manage Custom Packages.
Click Add Custom Package to create a new Custom Package to use in SuccessFactors.
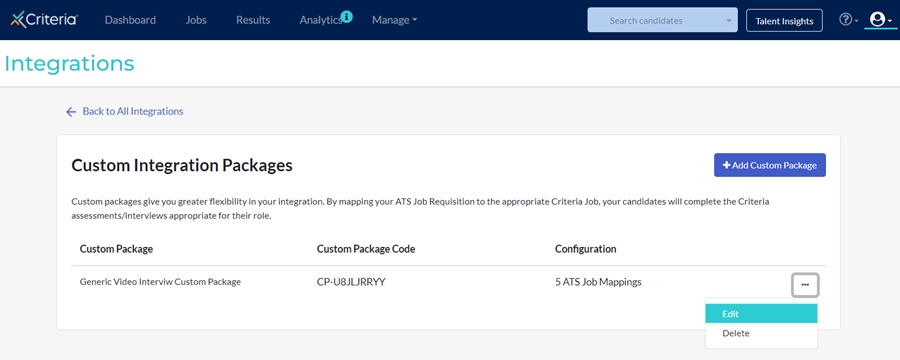
If you already have a Custom Package, click the 3-dots and choose Edit to edit that package.
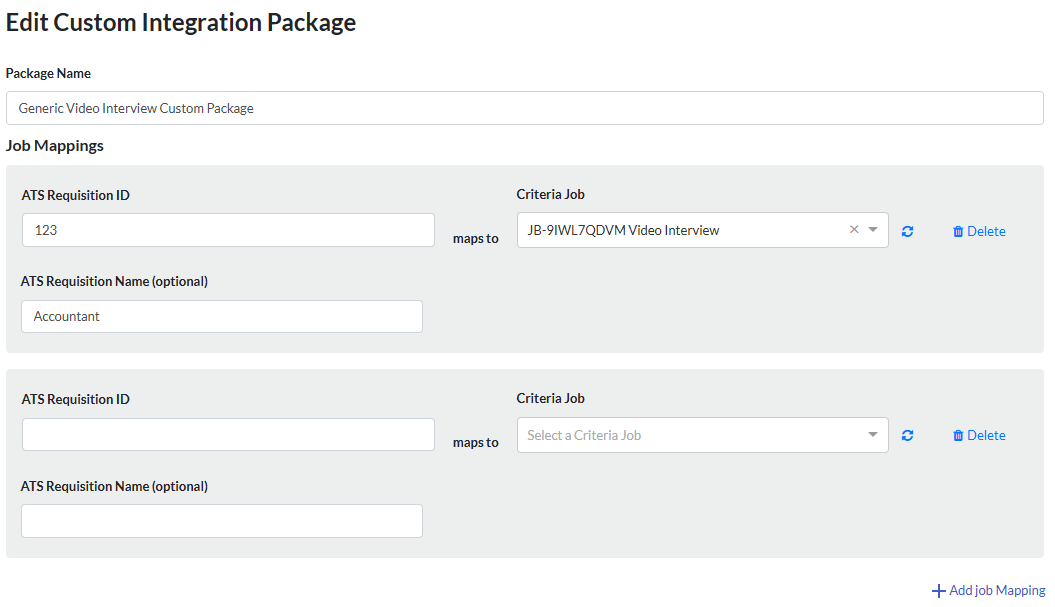
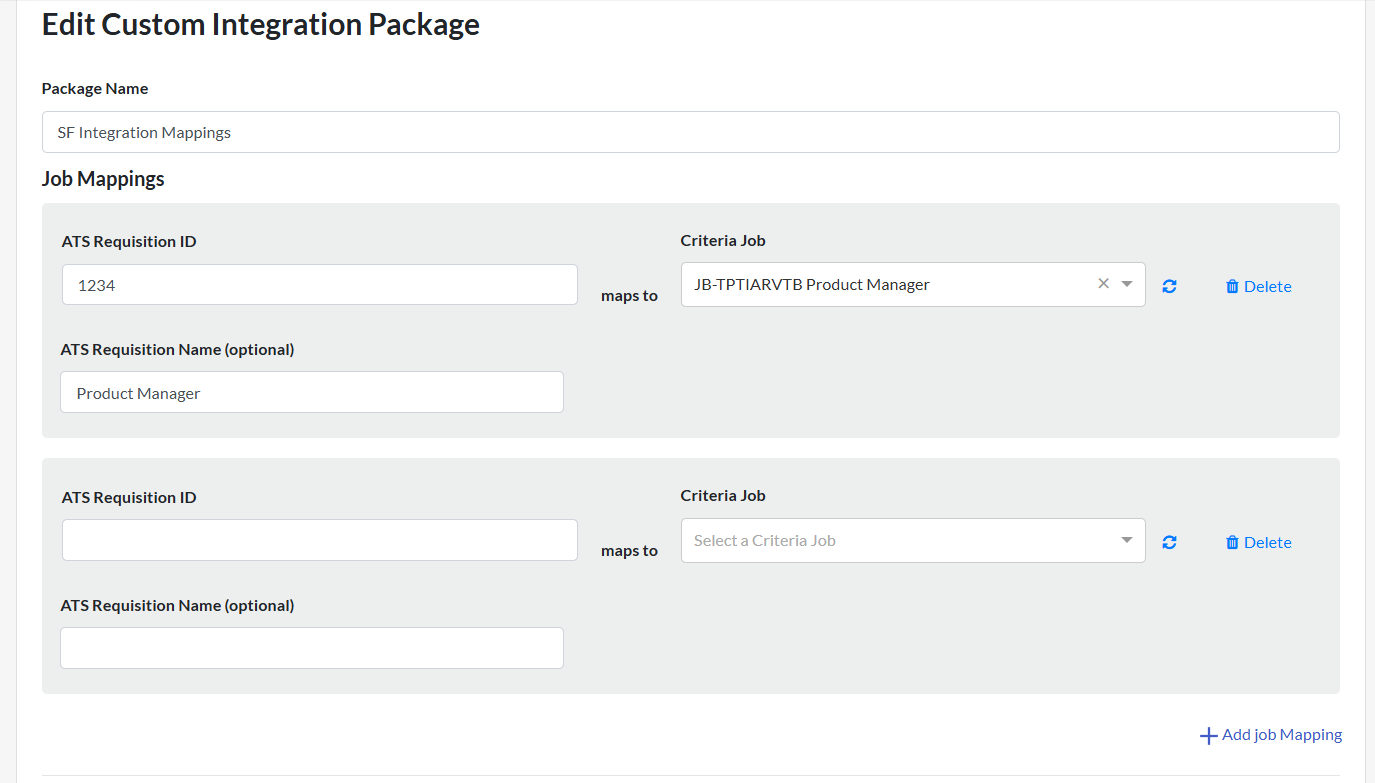
Give your package a name. In the Job Mappings section, copy and paste in the SuccessFactors Requisition ID and Name. Then choose the corresponding Criteria Job that the candidates should be invited to when they are invited from that SuccessFactors requisition. When selecting a Criteria Job, type the job name into the drop-down list to filter the list to easily select the item you are looking for.
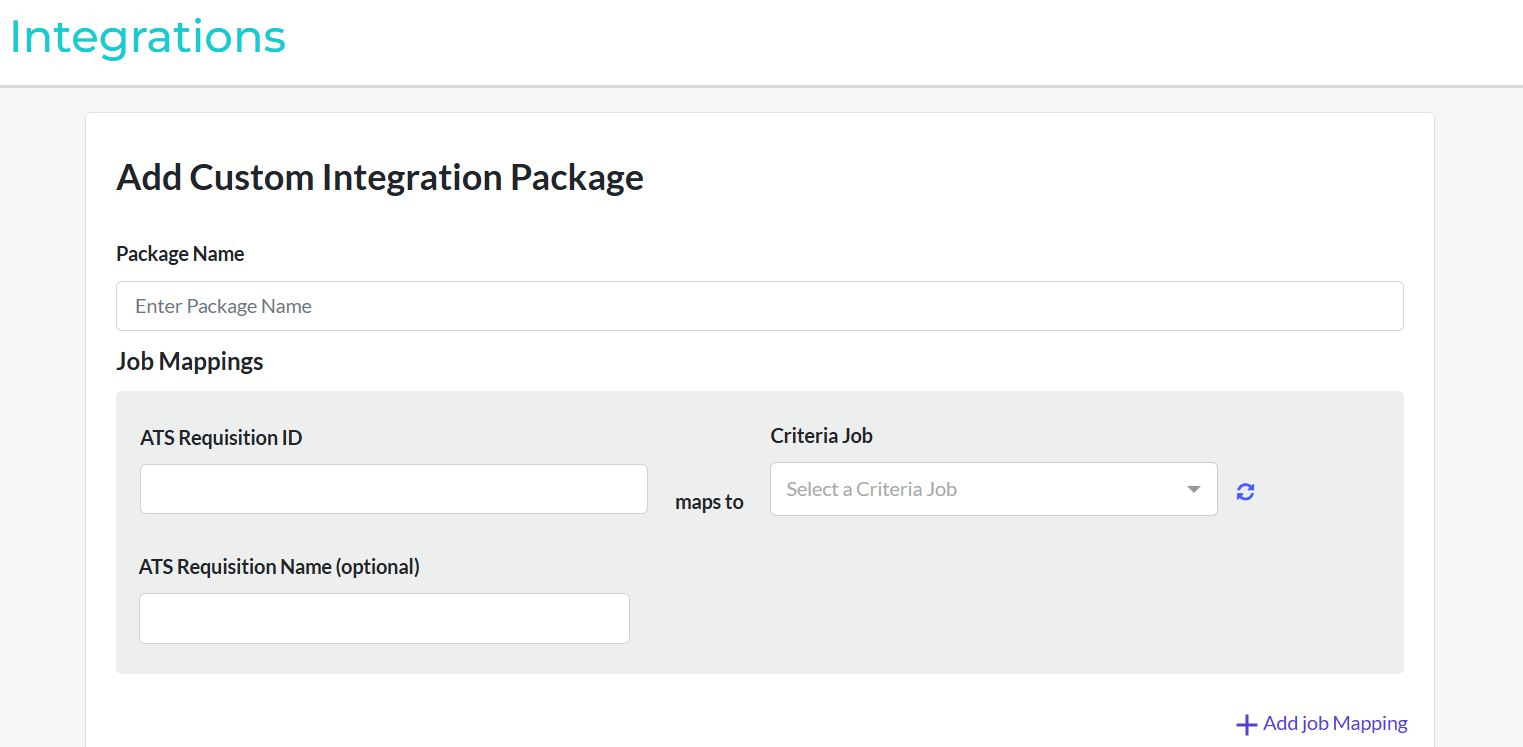
Use the Add Job Mapping link to add additional rows to the Job Mappings list.
In the Package Settings you have a few configuration options available for this Custom Package.
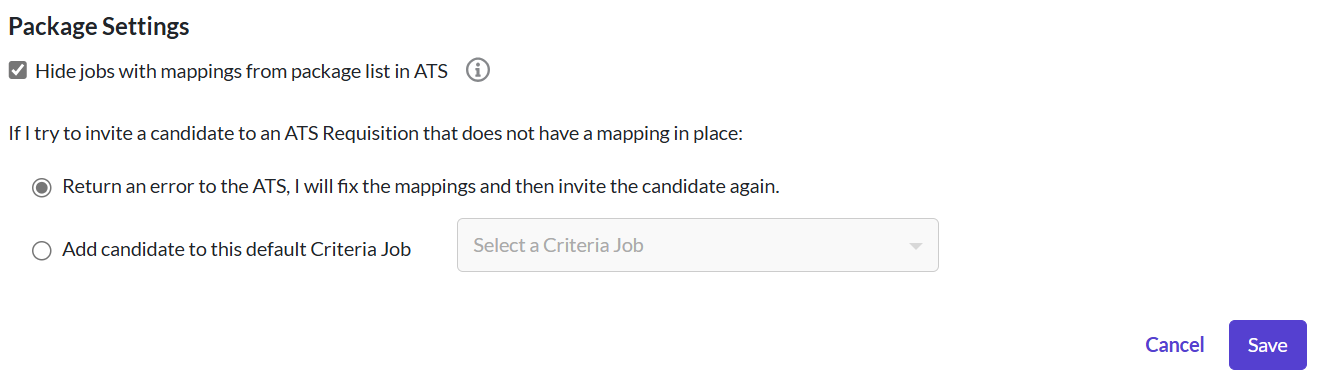
The Hide jobs with mappings from package list in ATS box (on by default) is not applicable to this integration as there is no live-pull of packages from Criteria into SuccessFactors. Leave this setting as-is.
Error Handling when mapping is missing
When you create a new Job in SuccessFactors, you will need to remember to update your Custom Package in Criteria to add a mapping for the new role. We understand that this step may be overlooked sometimes so we've included some options to allow you to choose what happens in this situation. Use the If I try to invite a candidate to an ATS Requisition that does not have a mapping in place options to choose what you would like to happen in this situation.
- Return an error to the ATS - use this option if you are happy to manually add the mapping to the Custom Package and then attempt the invitation again via SuccessFactors.
- Add candidate to this default Criteria Job - if you only want to customize the Criteria Job used for some roles, and for all other roles you have a default Criteria Job to use, choose this option and select the default Criteria Job to use when there is no specific mapping for a SuccessFactors Job.
e.g. you may want to always assess candidates for accounting roles using a set group of Assessments, however, if it's a Team Leader Accounting role you may want to use a different Criteria Job that has a slightly different configuration of Assessments. You would just need to add a Job Mapping for the Team Leader roles.
Click Save when your selections are complete. You can edit your package via the Criteria platform at any time.
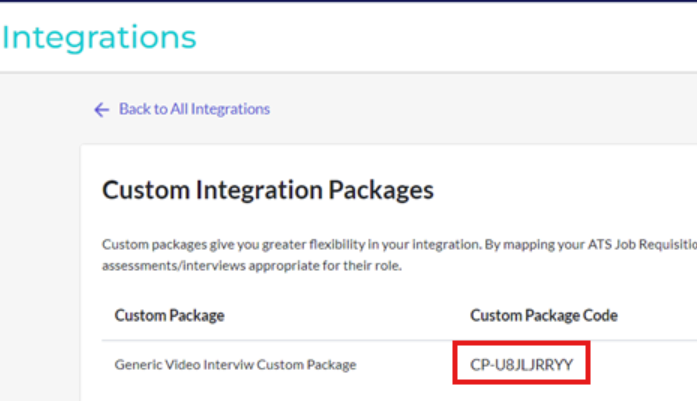
Once a Custom Package has been created, you can add it to SuccessFactors by copying the Custom Package Name and Custom Package Code from Criteria and using these as the package name and ID in SuccessFactors.

Permissions (Provisioning)
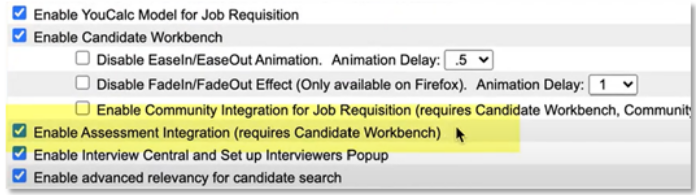
Go to Provisioning > Company Settings.
- Enable the Enable Assessment Integration setting.
- Enable SFAPI
- Enable SFAPI Webservices
Add Assessment Vendor (Admin Center)
Add CRITERIA as an Assessment Vendor. Users with Manage Assessment Vendors permissions can add assessment vendors.
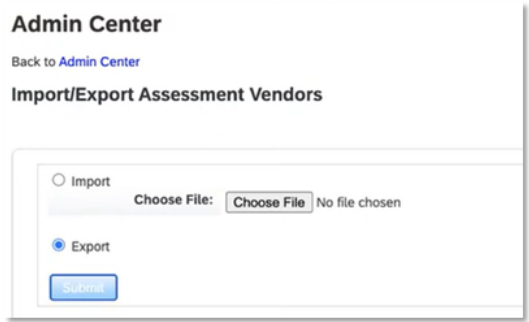
Go to Admin Center > Manage Assessment Vendors and export the current Vendors list.
Open the exported vendor list.
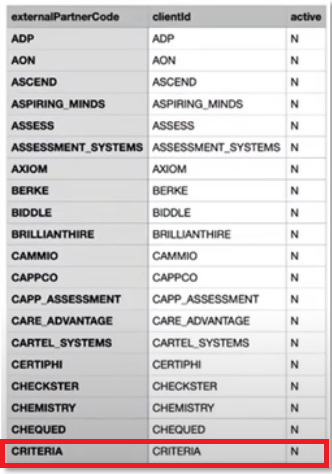
If CRITERIA is already in the list, change the active value to 'Y', otherwise, add a new entry to the list.
Note: This field is case-sensitive. Please ensure the vendor name is entered in all uppercase letters and matches CRITERIA exactly.
- External Partner Code = CRITERIA
- Client Id = CRITERIA
- Active = Y
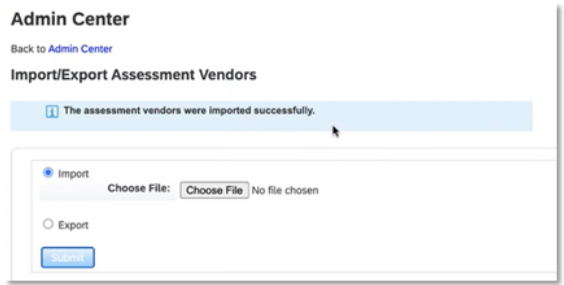
Upload the new Assessment Vendors CSV file into SuccessFactors.
Add Assessment Vendor Packages (Provisioning)
Now that your CRITERIA Vendor has been created, you can add the packages for that Vendor.
These packages will represent the Criteria Jobs that you will be able to invite candidates to complete. Criteria will provide these details, or you can get the details from your Criteria Platform Jobs list.
Note: SuccessFactors does not allow packages to be removed, only renamed. Please ensure that your packages have been finalized before adding them into SuccessFactors.
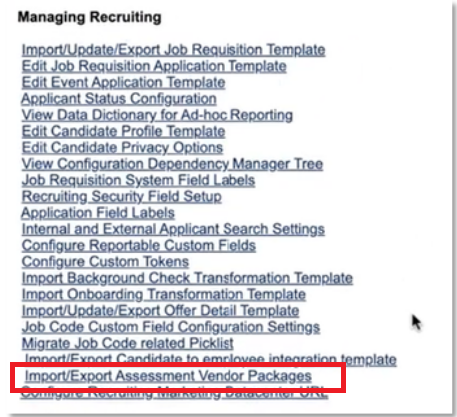
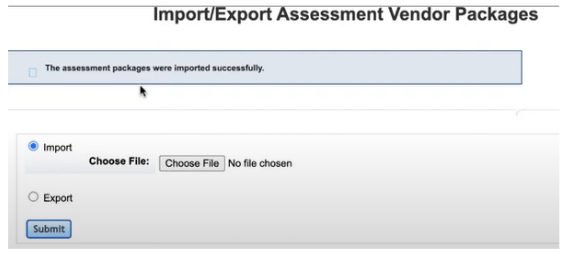
Go to Provisioning > Managing Recruiting > Import/Export Assessment Vendor Packages.
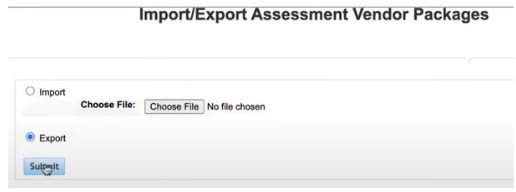
Export the current packages
Open the CSV and add the Criteria packages to the list, one per line. The following fields are mandatory:
- vendorId: identifies the assessment vendor the package uses. Enter CRITERIA, or whatever clientId you specified when you added the vendor.
- packageCode: identifies an assessment solution to use for the order. Generated by the third-party assessment vendors. Use the Criteria Job Code, in the format JB-123ABC which can be copied from your Criteria Platform jobs list.
- shortName: Shortened name of the package for use on the candidate summary page. The complete name appears elsewhere. Use the Criteria Job Name, or a shortened version if the name is too long to appear in the column heading
- Label for each locale: The combination of the country and location code for each language in which the assessment is displayed. For example: en_US, fr_FR. Add the Criteria Job Name into all the columns for the language/s you are using in SuccessFactors.
The following columns are included in the template but aren’t used. You can leave these empty:
- reportPackageCode
- comparisongroupID

Upload the new Assessment Vendor Packages CSV into SuccessFactors.
SFAPI Integration User (Admin Center)
Create the user that the integration will use to connect to SuccessFactors and provide the credentials to Criteria. The integration supports Basic Auth (username and password) and OAuth2.
Create an SFAPI integration user.
Grant Access to Event Notification Subscription permission to the SFAPI integration user.
Grant the SFAPI Retrieve Assessment Order permission to the SFAPI integration user.
Grant the SFAPI Update Assessment Report permission to the SFAPI integration user.
Enable the following permissions to the SFAPI integration user:
- Recruiting Permissions > OData API Application Export
- Recruiting Permissions > OData API Application Create
- Recruiting Permissions > OData API Application Update
Grant API User Login permissions for the SFAPI integration user.
Set the API logon exceptions. Go to Admin Tools > Password & Login Policy Settings > Set API Login Exceptions > Add. Then set the following:
- Username: Select the SFAPI integration user.
- Maximum password age (days): Set this option to -1 for the password to never expire.
- IP Address Restrictions: Designated IP addresses or address range for use with integration.
- US Data Center: 52.5.142.59, 34.226.132.221, 52.54.43.157, 34.230.185.36
- APAC Data Center: 54.253.214.156, 13.236.115.248, 13.238.90.15, 34.230.185.36
If you are using OAuth2, you will also need to enable OAuth2 for this user in SuccessFactors.
- Go to Admin Center > API Center > OAuth Configuration for OData. You can also access the tool by searching Manage OAuth2 Client Applications in the action search.
- Click Register Client Application.
- Provide a callback URL in the Application URL field. Use one of the following URLs:
- Select Bind to user, then enter the ISU user ID.
- Click Generate X.509 Certificate and complete the required fields.
- Click Generate, then download and save the certificate.
- Click Register to save your registration. Save the API Key, which serves as the client ID.
- The certificate and API Key will need to be provided to Criteria.
If you are using Basic Auth, provide the username and password to Criteria.
If you are using OAuth2, provide the username, OAuth2 Client ID / API key and OAuth2 Certificate to Criteria.
Event Notification Subscription (Admin Center)
Create a notification subscription so that Criteria will be notified when there is a candidate ready to be invited.
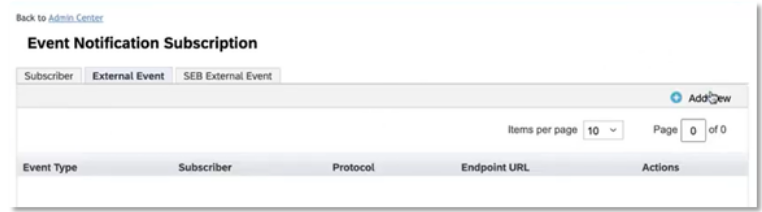
Go to Admin Center > Event Notification Subscription and click Add New to create a new subscription.
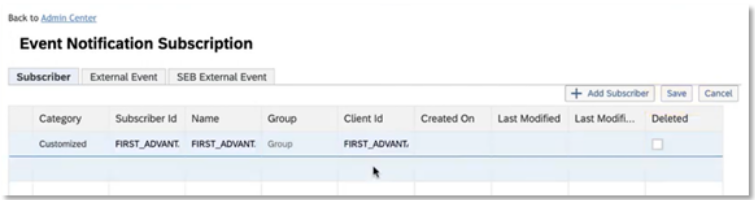
Go to the Subscriber tab, click Edit Subscribers then Add Subscriber. Click into the first blank row to edit it. Complete the following fields, leave the other fields blank.
Note: This field is case-sensitive. Please ensure the vendor name is entered in all uppercase letters and matches CRITERIA exactly.
- Category: leave as Customized
- Subscriber Id: enter the Vendor name - CRITERIA
- Name: enter the Vendor name - CRITERIA
- Client Id: enter the Vendor clientId - CRITERIA
Click Save
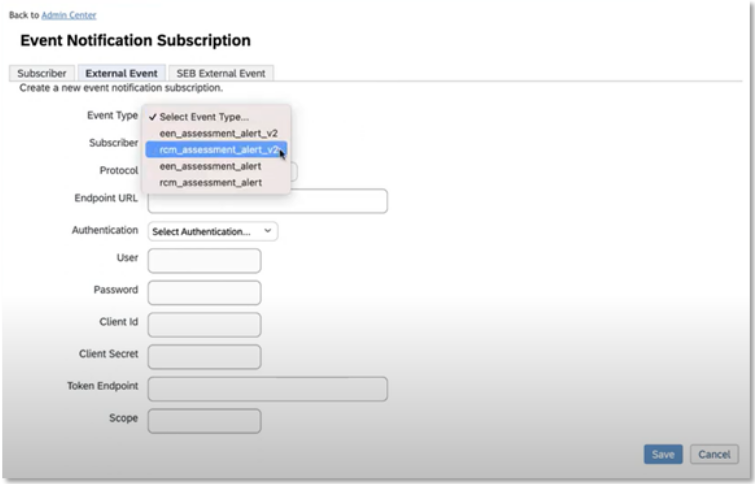
Go to the External Event tab and click Add New. Enter the details provided by Criteria which tell SuccessFactors how to notify Criteria that a candidate is ready to be invited.
Complete the following fields, leave the other fields blank:
- Event Type: rcm_assessment_alert_v2
- Subscriber: choose the Criteria subscriber that was just created - CRITERIA
- Protocol: SOAP_OVER_HTTP_HTTPS
- Endpoint URL: Use the URL provided by Criteria
- Authentication: BASIC
- User: api-token
- Password: Use the Password provided by Criteria
Add Assessment field to Job Requisition (Provisioning)
To allow the Criteria package to be configured on a Job Requisition, the Job Requisition XML template must be edited to include this field.
Add and permission the assessment field on the Job Requisition XML.
Job Requisition assessment field XML sample:
<field-definition id="assessment" type="derived" required="true" custom="false">
<field-label><![CDATA[Assessment association]]></field-label>
<field-description><![CDATA\[Assessmentasso]]></field-description>
</field-definition>
<field-permission type="write">
<description><![CDATA[job code permissions]]></description>
<role-name><![CDATA[R]]></role-name>
<status><![CDATA[pre-approved]]></status>
<field refid="assessment"/>
</field-permission>
The assessment field on the requisition has a link that allows the user to add multiple assessments to the requisition. However, assessment integrations only support one assessment per requisition. To avoid users selecting more than one assessment per requisition, we recommend adding a text field to the requisition template below the assessment field instructing the user to only add one assessment per requisition. Optional text: "Please Note: The assessment integration only supports one assessment selection per requisition."
Add the Assessment Integration feature permission and feature permission block to the Job Requisition XML.
The Assessment Integration feature permission is used to permission the Assessment Portlet in the applicant profile.
Add this for the status value/s that you are using for Criteria testing. (Default = New Application.)
Job Requisition Assessment Integration Feature Permission XML Sample:
<feature-permission type="assessmentIntegration">
<description><\!\[CDATA\[Operators with below roles can see Assessment detail report for the applicant when the application is in Phone Screen Status\]\]></description>
<role-name><\!\[CDATA\[S\]\]></role-name>
<role-name><\!\[CDATA\[T\]\]></role-name>
<role-name><\!\[CDATA\[O\]\]></role-name>
<role-name><\!\[CDATA\[R\]\]></role-name>
<role-name><\!\[CDATA\[G\]\]></role-name>
<status><\!\[CDATA\[Phone Screen\]\]></status>
</feature-permission>
<feature-permission type="assessmentIntegration">
<description><\!\[CDATA\[Operators with below roles can see Assessment detail report for the applicant when the application is in New Application Status \]\]></description>
<role-name><\!\[CDATA\[S\]\]></role-name>
<role-name><\!\[CDATA\[T\]\]></role-name>
<role-name><\!\[CDATA\[O\]\]></role-name>
<role-name><\!\[CDATA\[R\]\]></role-name>
<role-name><\!\[CDATA\[G\]\]></role-name>
<status><\!\[CDATA\[Default\]\]></status>
</feature-permission>
Hard Stop Status (Optional)
If you would like to stop a candidate from proceeding in the SuccessFactors pipeline until the Criteria package is completed, a hard stop may be configured on the Criteria testing status within SuccessFactors.
A hard stop status field is configured in the job requisition template as a standard field.
When the recruiter moves the candidate to a status past the hard stop status, the system checks if assessment triggers exist for the candidate and if all of them are completed. If yes on both counts, the new status is allowed. If not, the candidate won't be allowed past the status until all assessments are complete.
You can configure and assign permissions to the assessment hard stop field in the job requisition template, just like you can for other job requisition fields. This field is configured as a standard picklist field.
<field-definition id="hardstopStatus" type="picklist" required="false" custom="false">
<field-label><![CDATA[Hardstop Status]]></field-label>
<field-description><![CDATA[Hardstop status for assessments]]></field-description>
<picklist-id>jobReqStatus</picklist-id>
</field-definition>
Once configured, choose the hard stop status on the Job Requisition. Choose the same status that has been configured with a Criteria package on that requisition.
Email Template (Optional)
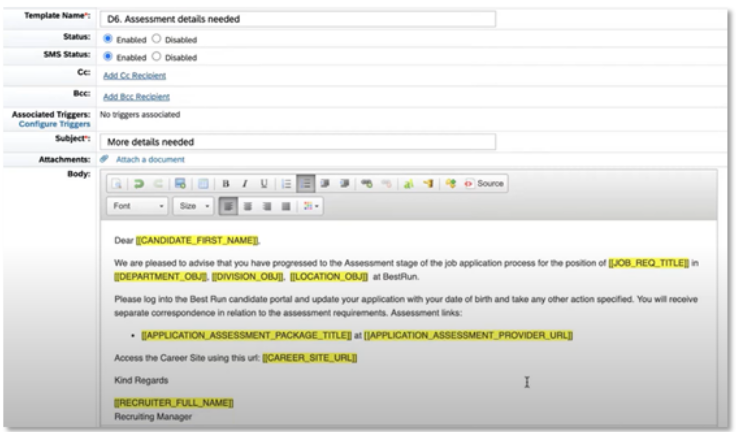
When the candidate is moved into the Assessment status and the testing with Criteria is triggered, an email is always sent from SuccessFactors. The default email template for this situation is D6. Assessment details needed.
For Recruiter Initiated testing, Criteria will send the invitation and reminder emails; the email from SuccessFactors should advise the candidate that they have advanced to the next phase and to action the email they receive from Criteria.
If Criteria testing is being initiated automatically On Application, by default the email will be sent by Criteria, however, the link could be sent in an email by SuccessFactors if you wish. The SuccessFactors email template would need to be edited to have the testing link included in the SuccessFactors email. If you opt for this method, be sure to inform Criteria that the Criteria invitation email should be turned off.
Edit the existing email template or create a new template with the testing link included dynamically in the body of the email. Ensure the text is shown in yellow in the template to confirm that the dynamic field has been inserted correctly.
- Criteria link: [[APPLICATION_ASSESSMENT_PROVIDER_URL]] (mandatory)
- Criteria package name: [[APPLICATION_ASSESSMENT_PACKAGE_TITLE]] (optional)
Screen Layouts
Update your candidate summary list screen in SuccessFactors to display the Status, Score and Recommendation columns so you can sort/rank your candidates.
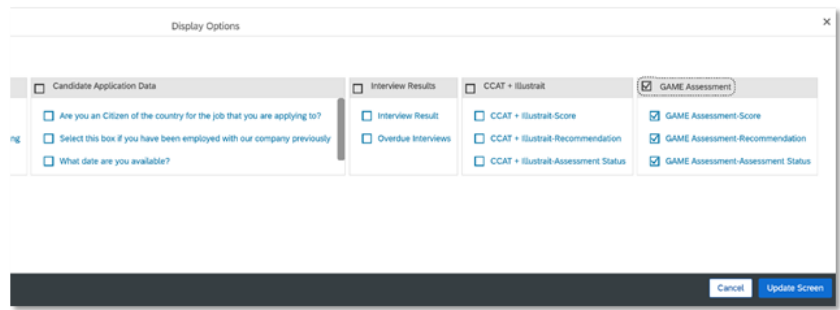
The Score and Recommendation columns headings will be prefixed with the Criteria package "Short Name" value. In this example, the Criteria package used in this requisition is called 'GAME Assessment'.
Using the Integration
On Application
Criteria assessments may be issued directly after application by associating Criteria testing with the New Application status.
If assessments are a mandatory step in the workflow, the Hard Stop status may be chosen to stop candidates from progressing until they have Criteria results available.
On the Job Requisition add/edit screen, click Add more assessments and complete the fields:
- Status: choose New Application
- Vendor: choose CRITERIA
- Assessment: choose the appropriate Criteria package
- Email Template: choose D6, or the appropriate email template for this situation.
Important: only configure 1 status to be associated with a Criteria package. Each Job may only be associated with Criteria testing in 1 status, however, that status may be different per Job.

Save the Requisition configuration.
If the Assessment you chose was a Criteria Custom Integration Package, login to Criteria and add a new mapping for this SuccessFactors requisition. Type in the SF Requisition ID and choose the Criteria Job that the candidates should be invited to complete.
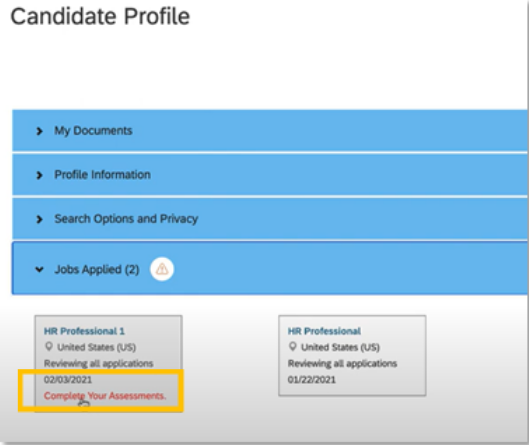
After the candidate applies for a Job Requisition with Criteria testing in the New Application stage, the candidate can click the link to view their profile. The Jobs Applied section in the profile will show a warning icon to indicate that there is an outstanding task. When the Jobs Applied section is expanded, the candidate will see the Complete Your Assessments link next to the Job they just applied for.
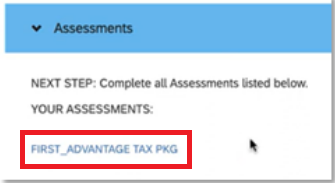
Clicking Complete Your Assessments will take the candidate to another page which shows the Criteria assessment package that they need to complete. The candidate will then click the assessment package name to start the testing. In this example, the package name is called 'FIRST_ADVANTAGE TAX PKG'.
In case the candidate does not go to into their profile, an email is sent from SuccessFactors to let them know that they need to complete the Criteria package. This email may include the link to the Criteria testing, or you may choose for Criteria to send the link directly to the candidate. This workflow will be discussed and configured when you set up the integration.
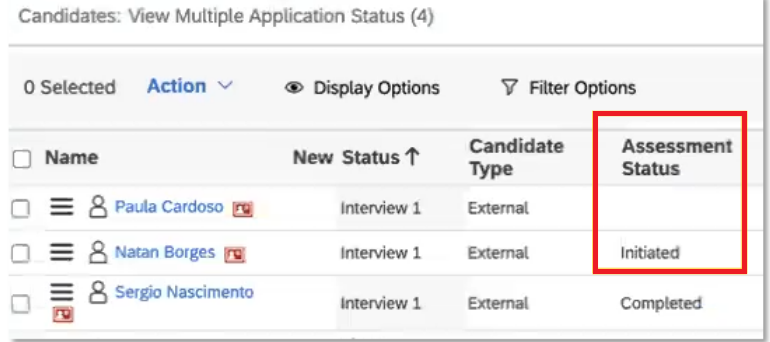
The candidate's Assessment Status will be updated to show Initiated to let you know that the invitation has been successful in Criteria and the system is waiting for the candidate to complete the testing.
If a due date has been configured in Criteria, Criteria will send a reminder email 24 hours prior to the expiry date.

Recruiter Initiated
To issue testing later in the recruitment process, Criteria assessments may be issued at any stage in the recruitment pipeline other than New Application.
If assessments are a mandatory step in the workflow, the Hard Stop status may be chosen to stop candidates from progressing until they have Criteria results available.
Configure the Job Requisition to trigger a specific Criteria package at the appropriate application status. (Use any status other than "New Application".)
On the Job Requisition add/edit screen, click Add more assessments and complete the fields:
- Status: choose the status you are using for Criteria testing
- Vendor: choose CRITERIA
- Assessment: choose the appropriate Criteria package
- Email Template: choose D6, or the appropriate email template for this situation.
Important: only configure 1 status to be associated with a Criteria package. Each Job may only be associated with Criteria testing in 1 status, however, that status may be different per Job.

Save the Requisition configuration.
If the Assessment you chose was a Criteria Custom Integration Package, login to Criteria and add a new mapping for this SuccessFactors requisition. Type in the SF Requisition ID and choose the Criteria Job that the candidates should be invited to complete.
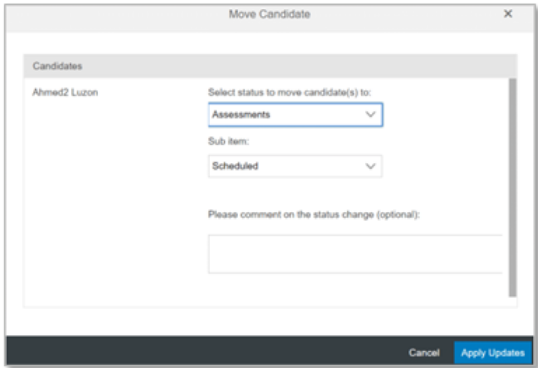
To trigger testing, update the candidate status to move them into the status that is configured with the Criteria package. This may be done per-candidate or in bulk.
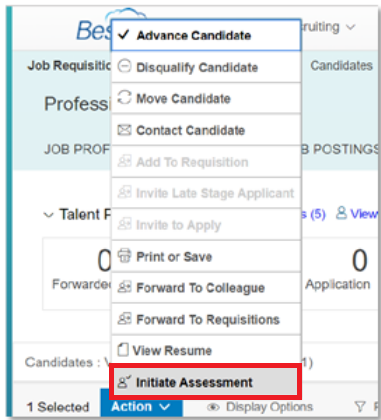
If the testing is not triggered automatically on status change, you can try again by using Action > Initiate assessment.
The candidate will be created in Criteria, and Criteria will send the invitation email to the candidate. The preconfigured SuccessFactors email will also be sent so the candidate knows to look out for the Criteria email.
The candidate's Assessment Status will be updated to show Initiated to let you know that the invitation has been successful in Criteria and the system is waiting for the candidate to complete the testing.
If a due date has been configured in Criteria, Criteria will send a reminder email 24 hours prior to the expiry date.
Add a Mapping to a Criteria Custom Integration Package
Each time you choose to use a Criteria Custom Integration Package on a SuccessFactors requisition, you need to tell Criteria what testing the candidates in this requisition should complete.
In Criteria, click on your avatar at the top right, and then select the Integrations menu. Click Manage Custom Packages.
Click the 3-dots and choose Edit to edit next to the package that you chose to use in your SuccessFactors requisition.
In the Job Mappings section, click the + Add Job Mapping link to add a new mapping row. In the new row, paste in the SuccessFactors Requisition ID and Name. Then choose the corresponding Criteria Job that the candidates should be invited to when they are invited from that SuccessFactors requisition. When selecting a Criteria Job, type the job name into the drop-down list to filter the list to easily select the item you are looking for.
Click Save.
Viewing Results - Assessments
Use the candidate list to see a summary of the status and results for the candidates in the requisition.
The Assessment Status will change to Completed once the Criteria package has been completed and results have been sent to SuccessFactors.
If you have displayed the Score and Recommendation columns in this view, they will show a summary of the results achieved. The Score column will show the Talent Signal from Criteria and the Recommendation column will indicate if the candidate met all the Score Ranges, or not.

Hover over the Score value to see the detailed score info from the assessments in the package, and the report link.
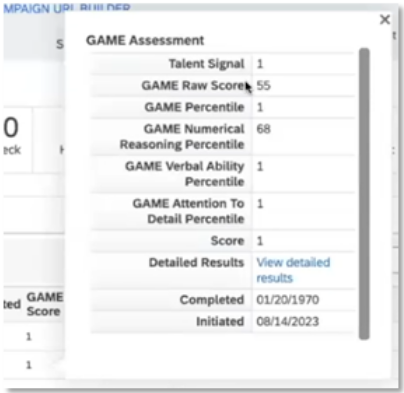
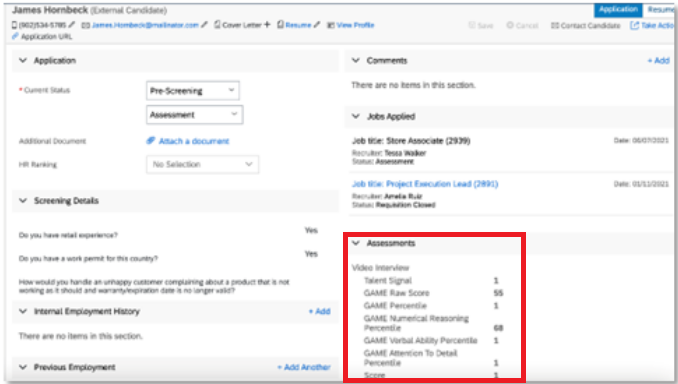
The same detailed information may be seen from the candidate profile.
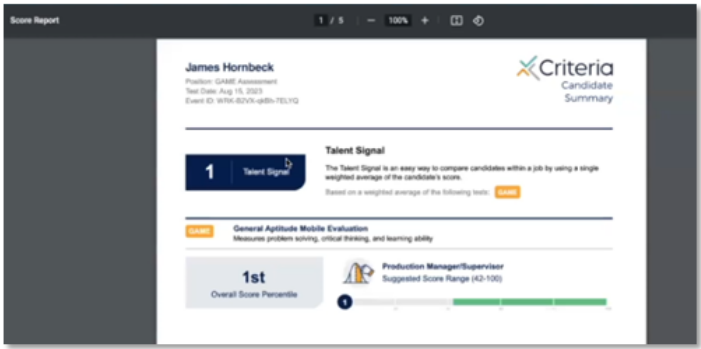
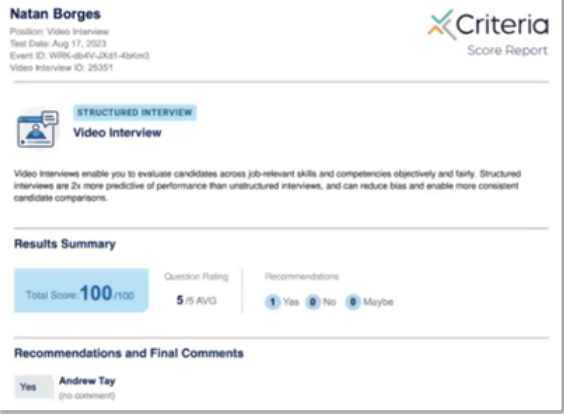
The View detailed results link will open the Criteria report in a new browser tab. This report may be in PDF or HTML format, depending on your Criteria account configuration.
Viewing Status and Results - Video Interviewing
When the candidate completes their video interview and when an evaluator completes their evaluation, the Assessment Status will update to Pending in SuccessFactors.
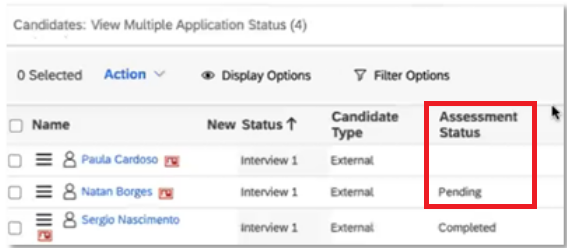
The Assessment Status will change to Completed once the minimum number of evaluators have completed their review, and results have been sent to SuccessFactors.
If you have displayed the Score and Recommendation columns in this view, they will show a summary of the results achieved. The Score column will show the Video Interview Score from Criteria and the Recommendation column will show the overall recommendation from each evaluator.

Hover over the Score value to see the report link.

The same information may be seen from the candidate profile.
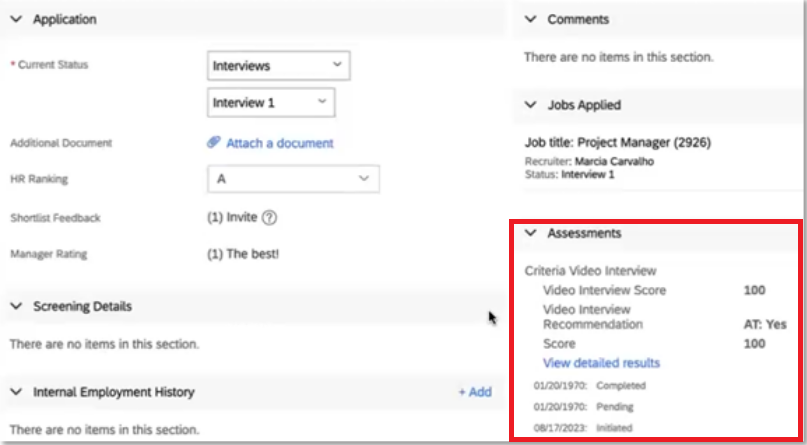
The View detailed results link will open the Criteria report in a new browser tab. This report may be in PDF or HTML format, depending on your Criteria account configuration.
Note: If an additional evaluator completes, another score block will be added to the candidate in SuccessFactors with the latest score.
Ongoing
Adding a new SuccessFactors Job to a Criteria Custom Package
If you are using Custom Integration Packages in your integration, when you add a new Job requisition into SuccessFactors you will need to add a mapping to your Criteria Custom Package so Criteria knows what to invite candidates to.
In Criteria, click on your avatar at the top right, and then select the Integrations menu. Click Manage Integration Settings, then click Manage Custom Packages.
Click the 3-dots next to the package you wish to edit and choose Edit to edit that package.
Use the Add Job Mapping link to add a new row to the Job Mappings list.
In the new row in the Job Mappings section, copy and paste in the SuccessFactors Requisition ID and Name. Then choose the corresponding Criteria Job that the candidates should be invited to when they are invited from that SuccessFactors requisition. When selecting a Criteria Job, type the job name into the drop-down list to filter the list to easily select the item you are looking for.
Click Save when you have finished adding the new row.
Updating Packages
Note: SuccessFactors does not allow vendor packages to be removed, only renamed.
If you are using Custom Integration Packages you will hopefully not need to remove any packages as they can be renamed/repurposed by updating the settings and mappings in Criteria.
- If a new Custom Integration Package is created in Criteria it should be added as a package in SuccessFactors to allow you to use it via the integration.
If you are using Standard Packages:
- If a Criteria Job is made inactive, you should rename the package in SuccessFactors so your users know not to use it anymore. E.g. you could add 'zz' or 'DO NOT USE -' to the front of the package name.
- If a new Job is created in Criteria it should be added as a package in SuccessFactors to allow you to use it via the integration.
Refer to the Add Assessment Vendor section in the Activation section above to download the current CSV of packages, make your changes, and upload the new CSV.
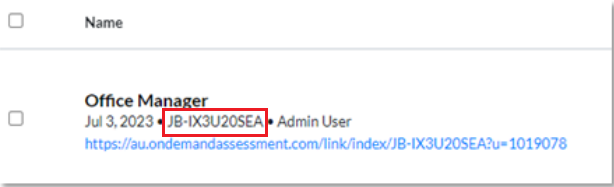
The Criteria Custom Integration Package Code can be copied from the Integrations > Manage Custom Packages menu in the Criteria Platform:
The Criteria Job code can be copied from the Jobs list in the Criteria Platform: